Painting your drywall will give it a more polished look, protect it from damage from small nicks and dents, and make your home feel like a new place to live. But before you paint drywall, follow the proper steps to ensure the best results. Drywall Painting requires sanding and adding a primer to ensure the paint adheres well. Read on Drywall Repair Las Vegas to learn more.
 When renovating your home, painting is one of the most economical and effective ways to revitalize a room or give it a new look. But if your renovation includes new or repaired drywall, you must follow a specific process to ensure the paint will adhere and the result is smooth. Skipping any step can lead to a failed paint job that requires extensive and costly repairs. To avoid this, follow these tips for proper drywall preparation and painting to achieve beautiful, professional results.
Before applying any primer or paint, it’s important to complete all your drywall repairs and patching. This will help prevent cracking and leaking later on.
After repairing a hole or patching a crack, sand the surface smooth before proceeding. Sanding the drywall is essential to ensuring that the new paint will stick properly and that it will last as long as possible. You can use a variety of sandpaper, but you should always start with the coarsest and work your way up to a smooth finish.
Once the sanding is complete, it’s important to clean the entire surface with a damp cloth to remove any dust and debris. This will ensure that the new paint will stick properly and prevent the need for future touchups or replacements.
It’s also a good idea to use a wood conditioner or primer on all wood surfaces before painting them. This will help the new paint to adhere to the bare wood and create a durable, moisture-resistant coating.
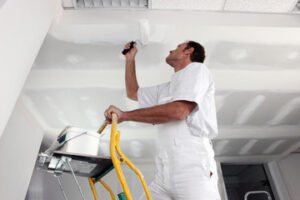
Another important tip to remember when painting drywall is to “cut in” along all adjoining surfaces. This is the process of getting into all corners, cracks and edges that the roller will not reach. To do this, apply masking tape to any areas that you do not want painted, such as the edges of walls and light switches.
Once the wall is ready for primer, a thin coat of primer should be applied. This will help the primer to bond with the drywall and will seal any imperfections on the surface. After the primer is dry, it’s a good idea to do a final sanding with 120 or 150 grit sandpaper. Then, the drywall is ready for a fresh coat of paint.
Many homeowners try to cut corners during the painting process, skipping steps like surface prep and primers. But, this can lead to an unsatisfactory finish. Without a good primer coat, you can experience problems like uneven paint coverage, faded colorations and dull walls.
Drywall primers are formulated to act as the base for your top paint layer. They typically come in neutral colors, giving you a basic foundation that will prevent bleed-through and create an even base. Then, you can tint your topcoat of paint to match whatever color you are trying to achieve.
When you are looking for a primer to purchase, it’s best to choose one that is designed for the type of paint you will be using. For example, a bathroom drywall needs to be able to stand up to moisture, so it’s important to find a water-resistant drywall primer. Additionally, you will want to make sure that the primer contains low VOCs (volatile organic compounds) so that it does not release harmful fumes during application.
It’s also important to remember that the use of a primer does not replace the need for an extra coat of paint. The primer is a base that helps the paint adhere and hide imperfections. However, if you are changing your wall color from a dark to light shade, it may take more than just one coat of paint to fully cover the old shade.
In some cases, it’s better to skip the primer and immediately begin painting once you’ve finished repairing and smoothing the drywall. This is especially true if you are working with old, worn drywall. This drywall may be brittle and have flaking spots. If you decide to skip the primer, be sure to sand the brittle spots down and apply another coat of drywall compound before applying your new paint.
There are also some situations where you should always use a drywall primer instead of a self-priming paint. If you are painting over wallpaper, you need a high-build primer to ensure that the glue does not soak through and stain the drywall surface. You should also use a primer when you are repainting a wall with a darker color. This will help to ensure that the lighter color won’t turn yellow over time.
Drywall can be painted with a variety of paints, but the best choice is acrylic latex. This type of paint adheres well to drywall and is easy to work with. It is also possible to paint a wall with a different kind of paint, but it will require more effort and may result in less professional results.
Adding color to a room is an inexpensive and effective way to transform the space. However, painting a bare drywall surface can be tricky and can lead to sloppy or uneven results. To avoid this, it is essential to follow proper drywall painting techniques and use the right paint for the job.
First, you will need to prepare the drywall for paint by washing it with soap and water to remove any dirt or debris. Then, you will need to sand the surface lightly using a sanding block or sanding knife to smooth it out. Once the sanding is complete, you will need to rinse the surface again with clean water and allow it to dry completely.
The next step in preparing a drywall surface for painting is to apply a coat of primer. It is important to use a primer specifically designed for drywall, as it will ensure that the paint adheres to the surface properly. A primer will also fill any small holes or imperfections in the drywall and create a smooth surface for the topcoat of paint.
Once the primer has dried, you will be ready to begin painting. It is recommended that you apply at least two coats of paint to a drywall surface, and if possible, three or more coats can help your walls look more vibrant and provide a better coverage. It is also a good idea to sand between each coat of paint with 150-grit sandpaper, as this will ensure that the next coat of paint adheres more fully to the previous layer.
Leaving a drywall surface unpainted can cause it to become chipped or cracked over time. Adding a coat of paint will protect the surface from damage and will make the wall easier to clean and maintain. It is a simple but essential step in the drywall painting process that can prevent future issues with your drywall.
Whether you are painting over old paint or applying a new color to your newly installed drywall, you will want to start with a high-quality primer. This will help to conceal sanding marks, add a level of protection to the wall from damage and ensure that the paint will adhere well and stay on for a long time. You can purchase a variety of different types of primers, but latex is the best for drywall because it has an easy application experience and will dry quickly. You can also choose a primer-sealer to fill in rough areas of the wall that may not be perfectly smooth. These products can cost a bit more but can save you the expense of having to apply an additional coat of paint later on.
Next, you will need to sand the surface of the drywall with a pole sander, as needed. If you’re going with a light texture, you will only need to sand the surface to a level 4. For more intense textures or dark paints, you may need to sand to a level 5.
Once you have sanded the surface of your drywall, you can then apply a coat of drywall primer. Allow this to dry for 24-48 hours and sand it again with 150-grit sandpaper. Then, you can begin painting your walls.
For a professional result, you should apply 2-4 coats of paint to your drywall. This will give you a smooth and polished finish that is resistant to damage and will look great for a long time. Be sure to sand between each coat of paint with your 150-grit sandpaper, as this will make the new coat of paint adhere more fully to the surface.
Finally, it is important to protect your flooring, furniture and adjacent surfaces from paint drips by covering them with a plastic sheet or canvas drop cloth. It is also a good idea to run painter’s tape around trim, casings and baseboards to prevent the new paint from seeping into small cracks or gaps. Finally, you should remove all sanding dust from the work area.